This is just a quick post to redirect everyone to my new site Shelaine.ca! Thank you to a wonderful friend my new site is up and running! Looking forward to sharing some new sewing adventures with everyone and looking forward to our new Canadian Cups blogging tour – stay tuned for more info on that coming soon!
I just wanted to announce the prize winners for the Great Canadian Craftsy Bag Tour!!
Congratulations to all of the winners!!
Prize Pack A: Jayne B. from Canada who correctly answered the trivia question
Prize Pack B: Di S. from the UK who correctly answered the trivia question
Prize Pack C: Karen P. who correctly answered the trivia question
Prize Pack D: Beverley P. of Australia who followed Janelle on Instagram
Craftsy Tote Kit: Winner will be chosen and notified by Craftsy directly.
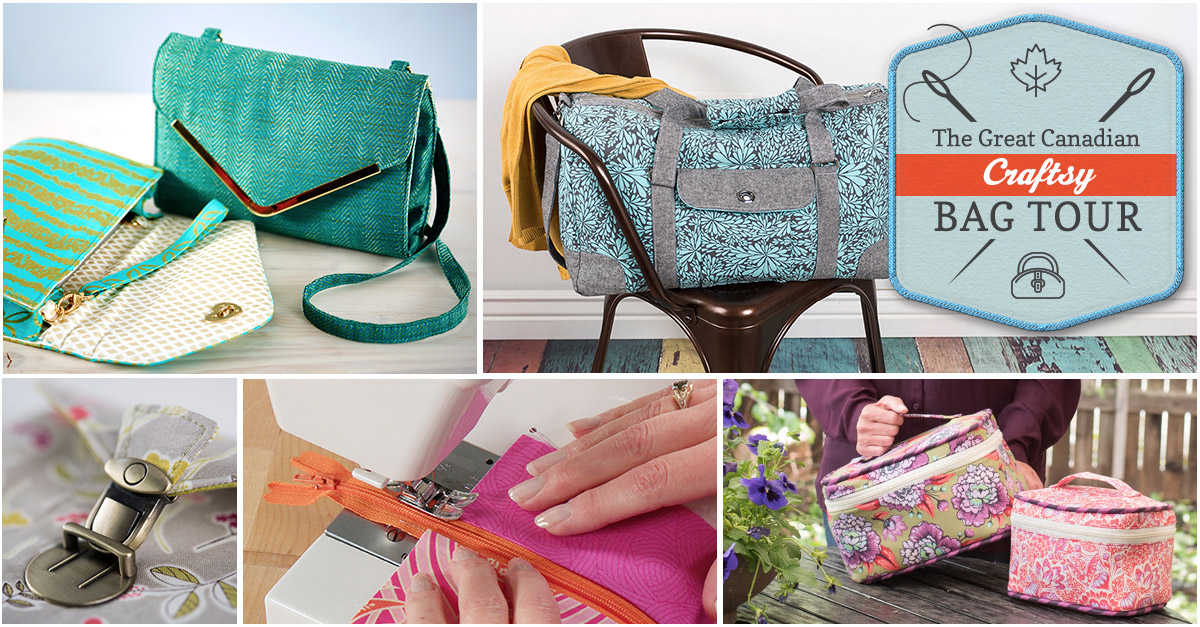
We’ve just barely made it home after our Craftsy escapade all across Canada. We’re unpacking our luggage and finding some great souvenirs from the trip, but it’s just too much to keep for ourselves. And because you’ve been such perfect road trip companions, we’d like to share them with you. Up for grabs are 4 coveted prize packs from our travels, as well as the special gift that Craftsy sent to us while we were gone galavanting.
Be quick about it! Giveaway closes soon.
* This post contains affiliate links. If you visit one of those pages via my link, I may receive a small commission from the seller, at no additional cost to you.
First up is the Craftsy gift:
* Please note: If you entered this giveaway before Friday, April 8, your entry may not have been recorded correctly by Craftsy. Please enter again. This colourful tote bag kit includes the Rowan Three-Quarter Patch Tote pattern, some stunning Kaffe Fassett fabric, plus all the Pellon Fusible Fleece stabilizer you will need for the project. The only things you would have to add to this are a coordinating button, some thread and your time. Voila! You have a gorgeous tote that will be the envy of tote-al strangers. It’s almost like instant Jello pudding, only better! Follow this link to enter before midnight April 11, 2016:
Enter to WIN a tote-bag kit
The Souvenir Prizes
Prize A (Canadian, US and International entries accepted)
Deadline for entries is 10 AM PST on Monday, April 11.
Winner’s will be notified by email within 3 hours of the contest closing, and will then have 24 hours in which to respond to the organizers.
It is each participant’s responsibility to ensure they sign in to Rafflecopter with a valid email address, and also check their email accounts for notification.
Entries requiring a blog post comment, social media follow, or trivia answer will be verified using the name provided by the participant.
The giveaway is open to anyone worldwide. International or US residents who win a prize designated as for Canadian Residents Only may be required to pay for the additional shipping, or forfeit the prize. If said winner chooses to forfeit the prize, another winner will be chosen from the remaining eligible entries.
Many, many thanks to all the wonderful people who’ve followed us on The Great Canadian Craftsy Bag Tour. We hope you learned a little about our very large, diverse and beautiful country while you got a peek into some of our favourite Craftsy classes.
And very special thanks to the amazing, supportive people who helped make the giveaway and our graphics just that much better: Celine from Blue Calla Patterns and Elle from Brand UR Shop Graphic Design. Take a bow ladies!
Happy travels until the next time we take you tripping and traipsing!
Marsha, Janelle, Deb, Fiona, Michelle, Reece, Shelaine & Ula
Craftsy Class Review – Sew Better Bags the Weekend Duffle with Betz White
Hello and Welcome from South Western Ontario to Day 5 of the our Great Canadian Craftsy Bag Tour!
Welcome to Canada’s sunny south where the weather today is a balmy 4 C with the sun shining. What better to do then sew?
Craftsy equips you with the tangible skills, quality materials, access to inspiring and like-minded crafters, and most importantly, the confidence to add your own creative twist to all that you create. Craftsy is committed to helping you express your unique passion, talent, and creativity!
Please note: I received this Craftsy class for the purpose of writing an honest review. All opinions and thoughts expressed within this review are all completely mine. This post also contains some affiliate links which means that if you purchase something after clicking on one of the affiliate links I may earn a small commission (but with no additional cost to you).
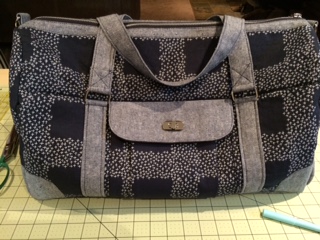
The class that I chose to review isSew Better Bags the Weekend Duffle with Betz White. I have been sewing for many years but have only recently starting sewing bags and blogging and am hoping to learn some new tips and techniques!
The class is broken down into seven different videos that covers all of the components of making the bag. There is also a PDF material list and directions that are included with the class. The videos run about 2 hours and 45 minutes.
Lesson 1. Preparing Materials
This lesson focused on cutting out and preparing the materials. There was a PDF that listed all of the materials and that came in super handy.
Lesson 2. Interior Pockets
This lesson worked through the interior of the bag.
Lesson 3. Exterior Pockets
This was a great lesson on different types of exterior pockets to put on your bag and this lesson also discussed the variety of hardware you could choose.
Lesson 4. Assembling the Bag Front & Back
This was a great lesson on the corner patches and other details that make the bag unique. It was my first time using corner patches and also using a zipper facing.
Lesson 5. Zipper & End Panels
I really enjoyed adding the zipper the way it is taught in this lesson. The zipper will never get caught in lining!! Also the end panel seams are all enclosed – I learned another way to add on end panels.
Lesson 6. Base of Bag
In this lesson the base is also enclosed.
Lesson 7. Finishing Touches
This is where I added the handle and the x’s on the handles. I really liked the extra finishing touches that really make the bag look professionally finished.
Hardware from Emmaline Bags
Love the zipper facing!
Overall Impressions…
I found that the instructor of the class Betz White to be very engaging and gave excellent directions. Betz seemed very confident in making the bag and gave very clear directions – I was easily able to watch the section of video and felt comfortable in working through the steps on my bag. I think that the favorite part about the instructor were her witty comments through out the class. Betz also gives the right amount of information through out the video so you feel confident working on your bag and do not feel overwhelmed.
I feel for a confident beginner bag maker the class was just the perfect amount of information and went at the perfect pace. I like that Betz captured all of the steps and I was able to try the steps and pause rewind or move forward at my own pace. Due to being a newby bag maker the content was great and I learned some new tips and tricks that I will be able to transfer to other projects.
What is my conclusions…..
This is a great class that I thoroughly enjoyed!! I also learned a number of tips and tricks that I will definitely be using for other projects. I will also buy some of Betz White’s other patterns.
This pattern is rated for a beginner sewer but I feel that it is more suited for a confident beginner.
The class usually costs $39.99USD (about $47.09CAD according to google today) but Craftsy are generously offering it for the reduced price of $19.99 USD by using this link up to the 15th April 2016.
Thank you so much for reading my blog and following the Great Canadian Craftsy Bag Tour!!
Shelaine
Come back here on Sunday, April 10 for your chance to win one of these prize packs.
As December continued my obsession with pin cushions continued!! After spending hours searching through Pinterest I found the one that would be my mother’s Christmas gift, my Mom who is an avid quilter. This was another tutorial from theDIYdish.com season 4, episode 1 for a Mannequin Pin Cushion. This was a super easy sew again and I used a small Christmas ball for the top and a candle stick from the thrift store for the base. This pin cushion has a million possibilities and I have a couple more in the works!!
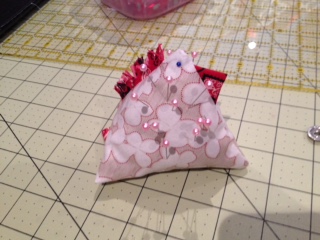
Well when you sew you need a pin cushion so I have been trying a few different patterns from a variety of patterns I have found on Pinterest. This little adventure started when I asked on the Swoon Facebook page what people’s favourites pin cushions were! This post had over 50 comments and may people included links to a variety of pin cushions. So with this in mind I started searching for a few to try! The first pattern I tried was a chicken that whipped up super quick and you can totally use any left over scraps. I now have about five of these chickens in a variety of sizes.
The next one was a little more challenging and gave me an opportunity to try some new sewing stitches. Again this pattern was a great way to use up some scraps! This is one of my favourite pin cushions.
The third pin cushion I created was a really cool bird that again used up some fabric scraps. The pattern was found on Pinterest but again I watched a video on theDIYdish.com. The guest for this project was Joel Dewberry – enjoyed watching this episode and seeing his fabrics. This is my version…
Please feel free to leave your comments about your favorite pin cushions!!
So last week I did a blog post about the Tulip from CloBird Designs and as I stated there were many mistakes in the first one. So I decided to take two. I whipped up another Tulip for a fellow sewer in a birthday group that I belong too. Here is the second one that I absolutely love. This little case is perfect size for sewing notions!
So today I thought that I would whip up some Peg Legs by Patterns for Pirates http://www.patternsforpirates.com to test out my White Superlock DW734 that I haven’t used in 15 years. This pattern was easy to print and match up. The pattern sizing was very true to size. The material I used was some super cheap and super thin 4 way stretch that I found at Lens Mills in London Ontario. The pattern went together very easily and the directions were very detailed! This was a super quick so and probably took an hour to cut out the fabric and sew together. All in all great pattern!!
Today I have decided to start writing a blog to detail my adventures in sewing. Recently I have been making bags. The first bag I would like to blog about is the one I have created most recently the “Tulip” by Clobird Designs – this is a free pattern offered by Crafty. I will add the link at the bottom of the post. I love this little accessory bag it is quick and easy to sew and is very spacious! The pattern consists of three different sizes including a passport size. The fabric I used is grey linen I purchased at Jo Ann Fabrics in Port Huron and the flower fabric is Michael Miller and was purchased at Ye Olde Fabric Shoppe in Stratford ON. My Tulip is not perfect but was a fun quick sew and will hold my supplies for an upcoming class. Please check out CloBird Designs Group on Facebook and try out some of Karis Vail Hess’s patterns.

")
")